Please click the tabs below to learn more about our shade sail products.
To see the measuring guidelines information, please click here.
A Shade Sail provides protection from the sun and looks great in your home’s outdoor areas – covering pools, barbeques, patio areas and spa’s. Shade sails are an aesthetically pleasing shade system that add value to the areas they cover.
They’re ideal for use in public outdoor areas – at shopping centres, car yards, mine sites, community centres, child care centres, construction sites, schools, outdoor playgrounds / activity areas and sporting venues.
Shade Sails can be fabricated in a variety of shapes, sizes and colours. In fact our team of expert designers and fabricators can construct just about any Shade Sail to suit just about any shape our customers require.
Shade sails are designed to cover outdoor areas and to provide protection from the harmful effects of the UV rays of the sun. Our Shade Sails are fabricated from premium high grade extra heavy duty cloth offering up to 96% UV protection whilst having the capacity to breathe to allow hot air to flow out.
Shade Sails can be easily removed if necessary.
Our Shade sails are designed for shade and are not waterproof.
Shade sails must be correctly installed. Your shade sail should be installed firm and tight so as to reduce windflap in the shade fabric. Shade fabric that is loose and sloppy will cause premature failure due to mechanical breakdown. An incorrectly designed and/or installed shade sail will trap water (and other debris) creating excessive load on both the shade sail and it’s fixing points.
Step 1 – Planning Your Sail Shade Structure.
There are many, very important considerations when planning your structure, and in fact this is the single most important aspect of the whole process. Proper planning will ensure that your sail structure performs in the way it was intended.
You will already have an area in mind that you wish to cover with a sail shade. It may be a paved area, a courtyard, a deck, a pool; regardless, the area is known but the “how to” remains in doubt.
There may be opportunities for creating attachment points for your sail on areas of existing structures, or you may need to install steel posts to create a totally free standing structure.
Always remember to ensure local building authority requirements for the structure are followed.
1. Movement of the Sun The sun rises daily in the east and sets to the west. As the seasons progress, it also moves from low in the sky during the cooler months to high in the sky during summer. Your structure should be planned to provide maximum shade protection for your particular requirements.
2. Sail Design & Architectural Twist Shade Sails work best when they are designed to have a “twist”, or architectural hypar effect. This is where the fixing points, being steel posts or brackets, are created at different heights, such that the sail is then twisted in order to fit. A flat sail or a triangle sail are harder to tension correctly, and in times of heavy downpour can catch and hold water for long periods of time, putting excess load pressure on the fixing points. Install your fixing points with diagonally opposite high and low points, to avoid these problems and create a great looking visually and functional structure.
3. Sail Size In order to fully tension the sail shade, It requires a space between the sail and fixing points for rigging tensioners, and also catenary curves in the sides of the sail. For larger sails, these tension gaps and catenary curves need to be quite large, to give maximum tension and longevity of the sail. It is strongly recommend that you install your fixing points further apart from each other than the actual shaded area you desire. As a general rule, your sail will begin about 300mm away from the fixing point, although this varies depending on the size of your sail.
4. Fixing to Existing Structures Caution is imperative when considering fixing to existing structures, such as your house. In instances of poor weather and strong winds, the loads placed on fixings by the sail are enormous.To ensure that your existing structure is adequate to handle such loads, you need to consult a local engineer or qualified builder. For the best safety practises, you should remove your sail when high wind conditions are forecast.
6. Post Footings Footing sizes vary dependant on the size of the structure and the height of the post out of the ground. An old conservative engineering principal is “1 third in, 2 thirds out”, which means posts out of the ground by 2400mm need to be at least 1200mm in the ground This is typically considered conservative. It is also a requirement to have the posts on an incline for better pre tensioning as correcting a post that has been leant over in high winds due to an undersized footing is a difficult job. Even a small movement of your footing will also compromise the ability to tension the sail. These hole diameters as a general rule, should be around 350mm however increasing as column sizes increase. Depth, however, is the most important factor
7. Underground Services Ensure your area is clear of underground services, such as sewage and water plumbing, or electrical cabling, prior to digging holes for your footings. Damages to services can be dangerous, and expensive to correct. Your local council will give you most underground services locations.
Planning
You probably already have an area in mind that you intend to cover with a sail shade.
There are numerous points to consider when planning your Shade Sail and as with all building projects not enough emphasis can be placed upon the importance of this aspect of the process. Thorough planning will ensure that your shade sail provides the benefits you intend it to.
As the sun moves across the sky from where it rises to where it sets the shade envelope created by your shade sail will also move. Additionally as seasons change the angle of the sun also changes. Very careful consideration should be given to your particular requirements when planning the location of your shade – remember the shade envelope from your sail will only ever be directly below it when the sun is at it’s very highest point. ( A simple but effective method of determining the “shadow throw” of the sun at a particular time in your location is to suspend lengths of rope at the approximate height and shape of your proposed shade sail and observe the shadow line at different times of the day ).
We recommend that you install your fixing points further away from each other than the actual shaded area you desire.
Design
Shade Sails are attached to free standing uprights (or suitable existing structures**) and therefore do not have any form of structural roofing support.
** Fixing to Existing Structures – Shade Sails place considerable loads/force on fixing points. If you are unsure that your existing structure ( ie: house, npergola, garage, shed etc) is structurally adequate to handle such loads, we recommend that you contact a local engineer or qualified building contractor for confirmation or use free standing steel uprights.
Shade Sail fixing points must be set at least at two alternate heights (This is to ensure that the sail does not trap water). Generally a square or rectangular shaped Sail will require two higher and two lower fixing points, with posts of equal height set at diagonally opposite corners to create a visually stunning and functional structure. A triangular shaped Sail will require one higher fixing point.
A flat sail or a triangle sail is harder to tension correctly, will “flap” around in the wind, and will pool water for long periods of time, putting excess loads on both the sail and the fixing points.
This is a guide only, schedules listed are based on typical shade sail installations under normal conditions.
Please Note: The fixings shown here are typical and are based on shade sail installations under normal conditions. Where the structural suitability of a pre existing structure is in question, or you are unsure or have any doubts at all, a local building inspector/contractor or structural engineer should be consulted before proceeding.
Eyebolts
We recommend fitting M10 Collared eyebolts to your uprights before positioning them.
Steel Columns for shade sails
|
Post Height |
Square area of Shade Sail |
||
|
up to 20 m2 |
20 – 35 m2 |
35-50 m2 |
|
|
2.1m |
100 x 100 x 3.0mm SHS |
100 x 100 x 4.0 SHS |
100 x 100 x 4.0 SHS |
|
2.4m |
100 x 100 x 3.0mm SHS |
100 x 100 x 4. 0 SHS |
100 x 100 x 4.0 SHS |
|
2.7m |
100 x 100 x 3.0mm SHS |
100 x 100 x 4.0 SHS |
100 x 100 x 4.0 SHS |
|
3.0m |
100 x 100 x 3.0mm SHS |
100 x 100 x 4.0 SHS |
100 x 100 x 4.0 SHS |
|
3.3m |
100 x 100 x 3.0mm SHS |
100 x 100 x 4.0 SHS |
100 x 100 x 4.0 SHS |
|
3. 6m |
100 x 100 x 4.0 SHS |
100 x 100 x 4.0 SHS |
100 x 100 x 4.0 SHS |
|
3.9m |
100 x 100 x 4.0 SHS |
100 x 100 x 4.0 SHS |
100 x 100 x 5.0 SHS |
|
4.2m |
100 x 100 x 4.0 SHS |
100 x 100 x 5.0 SHS |
100 x 100 x 5.0 SHS |
|
4.5m |
100 x 100 x 4.0 SHS |
100 x 100 x 5.0 SHS n |
100 x 100 x 5.0 SHS |
Footings for Shade sails
Posts should be directly embedded in Concrete (min 20mpa) footings.
The table below describes the minimum hole size you should use, based on the height of the post above ground level .
|
Post Height |
Footing Size |
|
2.1m – 2.5m |
300mm dia x 1300mm deep |
|
2.6m – 3.0m |
400mm dia x 1400mm deep |
|
3. 1m -3.9 m |
500mm dia x 1500mm deep |
|
4.0m – 4.5m. |
550mm dia x 1600m deep |
Post Installation
Posts should be set with an approx 5 degree angle leaning away from the sail tension. Allow min 5 days to set before fitting shade sails.
Please Note: The fixings shown here are typical and are based on shade sail installations under normal conditions. Where the structural suitability of a pre existing structure is in question, or you are unsure or have any doubts at all, a local building inspector/contractor or structural engineer should be consulted before proceeding.
Sail Track (also known as cara groove or annexe track)
The use of sail track is a very popular alternative that produces a flush edge along a wall or facia. The sail track should be fixed at 300mm (min) intervals.
Rafter Brackets
Rafter Brackets are an ideal method to locate fixing points at facia height. Take a roof tile out near the desired position, and locate a roof truss. The Rafter Bracket is fixed to the roof truss with M10 nuts & bolts.
Shade Sail Care and Maintenance Instructions
Heavy Duty Shadecloth is an Industrial Textile made from High Density Polyethylene, and combines Ultra Violet (UV) stabilisers and colour additives.
During the manufacturing process imperfections may occur. These imperfections are cosmetic only, and will not impact or interfere with the performance of the life of the shade fabric or the function for which it has been designed.
Your shade sail canopy should be installed firm and tight so as to reduce windflap in the shade fabric. Shade fabric that is loose and sloppy will cause premature failure due to mechanical breakdown. This is not UV breakdown and is not covered by the warranty. The shade sail will require periodic maintenance to ensure that the shadecloth fabric remains tight.
Your shadecloth canopy may become dirty over time. Care should be taken to avoid Chemicals that may contain Bleach, or other agricultural Chemicals containing Sulphur and or Halogens (chlorine Bromine). These Chemicals may attack the UV stabilisers within the Shadecloth, thus reducing the Life of the product and negating the warranty.
The following list of chemicals that may cause such interactions are only some examples and not exhaustive. Such chemicals may include: pesticides, metals, metal oxides and metal salts, all halogens and chemical compounds containing halogens or sulphur in all their oxidation states.
Care should be taken to avoid exposure to petrol, oils etc.
When cleaning the shadecloth, we recommend the use of a mild dish washing liquid with the use of a low pressure water hose and a soft scrubbing brush. We do not recommend the use of high pressure water, to blast the fabric clean.
The fabric warranties are not covered by such damage caused by storms, hailstorm, earthquake, mechanical damage done by birds or other animals, fire, lightening etc. Again this is not an exhaustive list and it is for reference only.
If you remove the shade sail , ensure that it is completely dry and stored in a dry place away from rats, mice and the like, preferably stored in a protective bag.
Please follow these directions for the installation of your shade sail…
The general principle for installing sails is to connect the highest corner(s) first followed by the remaining points.
Do not fully tighten each corner until all are attached to their relevant fixing points.
Once all points are loosely connected slowly work your way around the sail (starting at highest points first) tensioning each fixing point little by little until loads are distributed evenly at each corner.
Allow 2 people approx 7-10 mins to erect the sail. (one person approx 15)
directions for the shade sail installation
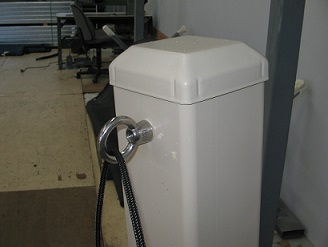
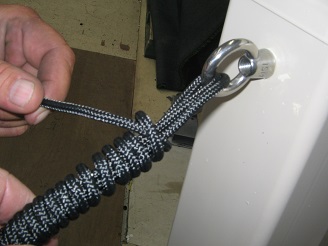
Step 1:
Place rope through eyebolt
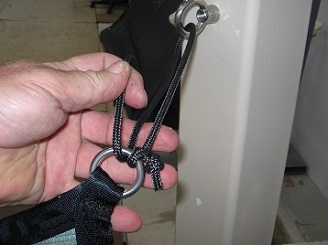
Step 2:
Then go back through ring on shade sail as shown i.e.: come up through bottom of the ring
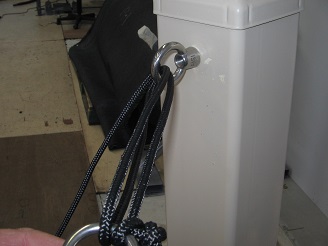
Step 3:
Then back through the eyebolt

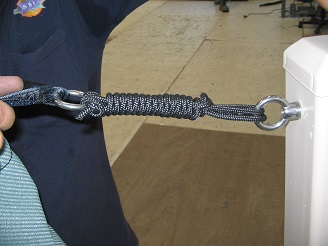
Step 4:
At this stage tie the fixing point off loosely and move on to the next corner.

Step 5:
Once all corners are attached loosely then start to work around the sail tensioning each point as tight as you can by hand.
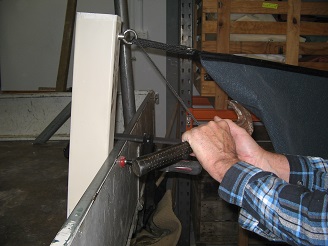
Step 6:
Once all points are reasonably tight using a steel bar or similar (bare hands are OK if they are tough enough to handle rope burn) tighten the sails fully.
Step 7:
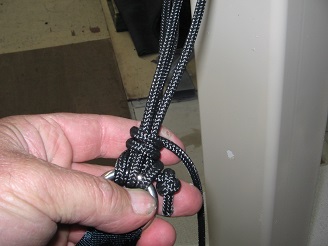
Then wrap the excess rope as shown around the sail a minimum of 3 rotations, preferably more.
Step 8:
Tie sail off using a minimum of 2 ½ hitches (granny Knots). Note that load is always placed on the fixing point and not the sail when tensioning. Tie each corner off as you go around.
Step 9:
Tuck excess rope away and finished tie off should look similar to this.
Navigation
Watch the video
See how the shade sails are made…
© ShadeSailsOnline.com | All Rights Reserved.
cw3